GET THE LOOK || Mary McDonnell [Phoenix Comic Con 2015]

It's the final day of Major Crimes Week here. *CRIES* I cannot believe that Major Crimes is back tomorrow night. I'm off Tuesday so I can stay up late and watch it. I'm really excited about that and I'm sure that my heart will be racing wildly in my chest as it tends to do when I'm excited for a show to return. I previously experienced that with Star Trek: Voyager and Battlestar Galactica. To close Major Crimes Week, I'm bringing you another dose of Mary McDonnell and showing you how you can get her look from her appearance at Phoenix Comic Con last weekend.
If you've been reading my blog for a while or have gandered at the right-hand side of my main page, you'll notice a list of Mary McDonnell/Sharon Raydor related posts. They are all the most most viewed posts of this blog. It's clear to see that I adore Mary McDonnell and that I love her style. There are loads of Get the Look type posts which show outfit ideas or makeup tutorials on this blog. She is one of my ultimate style icons. I even did a complete post on the lessons learnt from Mary's style.
T H E O U T F I T
When Mary shared her behind-the-scenes shot of getting set up for her photo-op at Phoenix Comic Con, you can imagine my reaction. Jaw on the floor and eyeballs falling out of my head doesn't even begin to describe my reaction. It was more along the lines of....


Point made? I was in love! Her outfit was just flawless and I was extremely envious of everything. I loved her blazer, the top, the jeans and the boots. Oh god, don't get me started on the boots! My kingdom for her boots! Hell, my kingdom for legs like hers. But enough about that, moving on.
What I really loved about her outfit was the pop of colour from the blood orange floaty-style top that she was wearing. It was flattering to her skin tone and suited her hair colour perfectly. It drew the right amount of attention.

Photo of Mary McDonnell from her Twitter account.
- Black Crepe Blazer || New Look - £24.99
- Buckle Shoulder Detail Top || George - £12.00
- V-Vest Top || George - £10.00
- Orange V-Neck Top || Topshop - £16.00
- V Neck Pleat Top || Jasper Conran @ Debenhams - £28.00
- Dark Blue High Waisted Super Skinny Jeans || New Look - £22.99
- Suede Ankle Boots || H&M - £39.99
I let you all in on a little secret. I bought the Buckle Shoulder Detail Top before I even started researching this post. I was in Asda the day after this photo was released on Twitter and I saw the top and I bought it. The George top is quite sheer so you'll need a vest underneath. I have a weakness, I know. Also, I've ordered the boots from H&M. As I said, I'm weak.
T H E M A K E U P
To get a look at her makeup, I had to wait until the photos started to make their rounds on the internet from the fans that had their photo taken with her - thank you, Tumblr. Mary's makeup looked amazing throughout Phoenix Comic Con. I was in awe and in love with everything about her makeup. Her skin looked very fresh, flawless and dewy and her eyes were smouldering. I was drawn to her eyes in all of the photos that were shared online.
I'm going to attempt to recreate this look using products that can be found in the drugstore so that it's a very affordable look for anyone that wants to recreate it too. I always say that you don't have to use exactly what I use. If you have anything in your own collection that looks similar in colour, use that. You don't have to go out and spend a load of money.
Additionally, do you own foundation routine. I'm extremely fair skinned compared to a lot of people and a lot of my face products have the labels Fair, Porcelain or Ivory written on them, Use whatever foundation and conceal works for you.
Let's get started.


I did things a little differently for this tutorial as I've included everything from foundation through to lipstick. For my foundation, I used L'Oreal's Mattifying Infallible foundation (Porcelain). Don't be put off by the fact that it has 'mattifying' in the name. It doesn't make your skin look matte all over. It works in the places that need a little shine control. For me, that's my forehead. I love how light this foundation feels and how it gives a good amount of coverage without making my skin feel dry at all. I dotted it over my skin (I chop and change how I actually apply my foundation) and buffed it into my skin using my Real Techniuqes Buffing Brush. My face. Why so serious?


This is where I did things differently and skipped straight to my eyebrows. No rhyme or reason, I just wanted to. To attempt to tame those brows, I used my Soap & Glory Archery eyebrow pencil (Blondeshell). My brows are thicker than Mary's and need a lot of work to make them look half decent en este momento. I need to get them waxed before I go away on holiday in two weeks - I don't know what I'm more excited for, the holiday or better eyebrows.
I used the comb to brush the hairs into place and then used the pencil side to create some definition. I have no brow game, like, zero brow game. Mary has brow game. I dunnae.


I then took my Collection Lasting Perfection concealer (Fair) and dotted it on my eyelids and blended it out. Yes, my eyelids. I use this to prime my lids for eyeshadows. This cancels out any discolouration that I have. I set it using my L'Oreal True Match pressed powder (Rose Ivory) and my Real Techniques Setting Brush. Using a concealer like this gives the shadows a way to show up a lot easier than if you applied them straight to the largely translucent skin of the eyelid.


If you've watched any of my other tutorials on this blog, you know this step was coming. I took my Sleek i-Divine Ultra Mattes (v2) eyeshadow palette. I took the peachy-toned eyeshadow, Flesh, on my Sephora Crease Shadow brush and applied from my outer corner through the socket in windshield wiper motions and then taking the excess lightly over the lid.


To darken up that outer corner of my eye, I took Paper Bag (a deep brown shadow) from that same palette on my Seventeen eyeshadow brush. I tapped any excess off on the back of my hand as I didn't want a lot of product on the brush.

I buffed everything out using my Real Techniques Deluxe Crease Brush so that everything blended together seamlessly and that there were no harsh edges.


I brightened up the eyelid a little bit by taking Dune from the palette, a flesh toned shadow. I used my Real Techniques Base Shadow brush.


On a clean Seveteen eyeshadow brush, I took Thunder from the palette - a matte grey eyeshadow and applied it to my outer corner. I then took it a little into the socket/crease area. I only wanted to darken up that outer corner as photos indicated to me that Mary has a kind of smokey eye going on. Tread lightly but you can darken it as much as you want.. I used my MAC 217 initially. My 217 is thoroughly loved and so it's not as precise as it used to be and I wanted a precise application of this shadow. I swapped it for a Seventeen eyeshadow brush.


I then moved onto my eyeliner. You can use whatever eyeliner you want and are most comfortable with. I'm most comfortable with gel liner and so I took my Maybelline Lasting Drama gel liner and a densely packed angled liner brush - I bought this one in Sephora last year as part of a set. I love how small it is and how tightly packed the bristles are.
I took a small amount of the product until the brush and lined my upper lashline starting in the middle and using small, minute strokes. You can do your liner as thick as you want to. The liner that Mary had on looked thicker than it was thin and so I drew a line of medium thickness. I tried to keep the top line of it as even as possible as I made it thicker at the outer corner and thinner towards the inner corner.


This is optional as I prefer to do it and it may not be to everyone's liking. I tightlined my upper waterline using my Rimmel Special Eyes Precsion eyeliner pencil. I ran this along the lip under my lashes from inner to outer corners.


I then lined my waterline using that same pencil and ran it about three-quarters of the way along. You can build this up as much as you want and smoke it out a little. I was very light-handed for some reason. Oh well.


I curled my eyelashes and applied some mascara to my top lashes. I used Seventeen's FalsifEye HD mascara*.


Back to the face! Time for concealer! Finally! To start with, I used my Maybelline Fit Me Concealer (15 Light) under my eyes and on any blemishes. I have one nasty little blighter under my lip. I used my finger to apply the concealer to that bad boy as I didn't want to infect the wand. That would not make for good times! I blended the spot with my finger and then used my Real Techniques Expert Face Brush to blend out my under-eye concealer.


To brighten my under-eye area and to give my eyes a little makeshift lift, I took my Collection Lasting Perfection concealer and draw a triangle shape under my eyes. I used the Expert Face brush from before and blended it out in patting motions and blended it towards my temples to give that lifted effect.


I set that concealer with my L'Oreal True Match pressed powder (Rose Ivory) and my Real Techniques Contour Brush. I use the contour brush under my eyes and then use the Real Techniques Powder Brush for the rest of my face. If you have oily skin, it's best to set your foundation and concealer. If you've got drier skin, you don't have to. I have drier skin but I do like to set everything as I like the finish. You do you.


To give some warmth to my face, I used L'Oreal's Glam Duo bronze & highlight kit (Blonde). On my Real Techniques Blush brush, I took some of the bronzer and brushed it around the perimeter of my face. A tip is to draw an elongated '3' shape down the side of your face - sweet down from the forehead, go in for the cheekbones, and then out and down along the ears and back in for the jaw-line. 3, is the magic number.


Blush time is my favourite time. To give a healthy flush to my skin, I used a pink-y blush. I don't have a lot of drugstore blushes as I like to splurge on the more high-end offerings. I took Sleek's blush in Rose Gold, which is labelled as a great dupe for NARS 'Orgasm' blush, on my Deli Plus powder brush (I'm obsessed with this brush). There is just a hint of shimmer in this blush that will give a beautiful glow to the cheeks.


Mary's lip colour looked a great mix between peach and nude. I don't really have a lipstick like that but I took the only peach-y toned lipstick I have which is Seventeen's Stay Pout in Just A Fling.


So that concludes Major Crimes Week, everyone. Can we take a moment and just have a sniffle and look back on all the fond memories from the past week. We got to see how to get the look of DDA Emma Rios and DDA Andrea Hobbs the gals with the power to make deals! We also got the look of Captain Sharon Raydor, the best damn captain out there, and one of her detectives, Amy Sykes. Then today, here is a post on how to get the look of the woman behind Captain Raydor, Mary McDonnell (I nearly typed Major McDonnell - there's a certain ring to that, haha) and the outfit she wore at Phoenix Comic Con where she did a panel for Major Crimes. It's all related in a round about kind of type of way.
I hope that you all enjoyed the posts from this week and are excited for tomorrow night's premiere! It's been an absolute pleasure to put these posts together for you all and I cannot thank you all enough for coming over and taking a look at this lil blog. It means the world to me.
Regular programming resumes tomorrow and I'll be doing some different makeup tutorials, unlike anything on this blog (well, maybe on par with the Guardians of the Galaxy themed tutorials), so come back for those if you want to. Have a wonderful day and I'll see you all soon.

Let's get started.


I did things a little differently for this tutorial as I've included everything from foundation through to lipstick. For my foundation, I used L'Oreal's Mattifying Infallible foundation (Porcelain). Don't be put off by the fact that it has 'mattifying' in the name. It doesn't make your skin look matte all over. It works in the places that need a little shine control. For me, that's my forehead. I love how light this foundation feels and how it gives a good amount of coverage without making my skin feel dry at all. I dotted it over my skin (I chop and change how I actually apply my foundation) and buffed it into my skin using my Real Techniuqes Buffing Brush. My face. Why so serious?


This is where I did things differently and skipped straight to my eyebrows. No rhyme or reason, I just wanted to. To attempt to tame those brows, I used my Soap & Glory Archery eyebrow pencil (Blondeshell). My brows are thicker than Mary's and need a lot of work to make them look half decent en este momento. I need to get them waxed before I go away on holiday in two weeks - I don't know what I'm more excited for, the holiday or better eyebrows.
I used the comb to brush the hairs into place and then used the pencil side to create some definition. I have no brow game, like, zero brow game. Mary has brow game. I dunnae.


I then took my Collection Lasting Perfection concealer (Fair) and dotted it on my eyelids and blended it out. Yes, my eyelids. I use this to prime my lids for eyeshadows. This cancels out any discolouration that I have. I set it using my L'Oreal True Match pressed powder (Rose Ivory) and my Real Techniques Setting Brush. Using a concealer like this gives the shadows a way to show up a lot easier than if you applied them straight to the largely translucent skin of the eyelid.


If you've watched any of my other tutorials on this blog, you know this step was coming. I took my Sleek i-Divine Ultra Mattes (v2) eyeshadow palette. I took the peachy-toned eyeshadow, Flesh, on my Sephora Crease Shadow brush and applied from my outer corner through the socket in windshield wiper motions and then taking the excess lightly over the lid.


To darken up that outer corner of my eye, I took Paper Bag (a deep brown shadow) from that same palette on my Seventeen eyeshadow brush. I tapped any excess off on the back of my hand as I didn't want a lot of product on the brush.

I buffed everything out using my Real Techniques Deluxe Crease Brush so that everything blended together seamlessly and that there were no harsh edges.


I brightened up the eyelid a little bit by taking Dune from the palette, a flesh toned shadow. I used my Real Techniques Base Shadow brush.


On a clean Seveteen eyeshadow brush, I took Thunder from the palette - a matte grey eyeshadow and applied it to my outer corner. I then took it a little into the socket/crease area. I only wanted to darken up that outer corner as photos indicated to me that Mary has a kind of smokey eye going on. Tread lightly but you can darken it as much as you want.. I used my MAC 217 initially. My 217 is thoroughly loved and so it's not as precise as it used to be and I wanted a precise application of this shadow. I swapped it for a Seventeen eyeshadow brush.


I then moved onto my eyeliner. You can use whatever eyeliner you want and are most comfortable with. I'm most comfortable with gel liner and so I took my Maybelline Lasting Drama gel liner and a densely packed angled liner brush - I bought this one in Sephora last year as part of a set. I love how small it is and how tightly packed the bristles are.
I took a small amount of the product until the brush and lined my upper lashline starting in the middle and using small, minute strokes. You can do your liner as thick as you want to. The liner that Mary had on looked thicker than it was thin and so I drew a line of medium thickness. I tried to keep the top line of it as even as possible as I made it thicker at the outer corner and thinner towards the inner corner.


This is optional as I prefer to do it and it may not be to everyone's liking. I tightlined my upper waterline using my Rimmel Special Eyes Precsion eyeliner pencil. I ran this along the lip under my lashes from inner to outer corners.


I then lined my waterline using that same pencil and ran it about three-quarters of the way along. You can build this up as much as you want and smoke it out a little. I was very light-handed for some reason. Oh well.


I curled my eyelashes and applied some mascara to my top lashes. I used Seventeen's FalsifEye HD mascara*.


Back to the face! Time for concealer! Finally! To start with, I used my Maybelline Fit Me Concealer (15 Light) under my eyes and on any blemishes. I have one nasty little blighter under my lip. I used my finger to apply the concealer to that bad boy as I didn't want to infect the wand. That would not make for good times! I blended the spot with my finger and then used my Real Techniques Expert Face Brush to blend out my under-eye concealer.

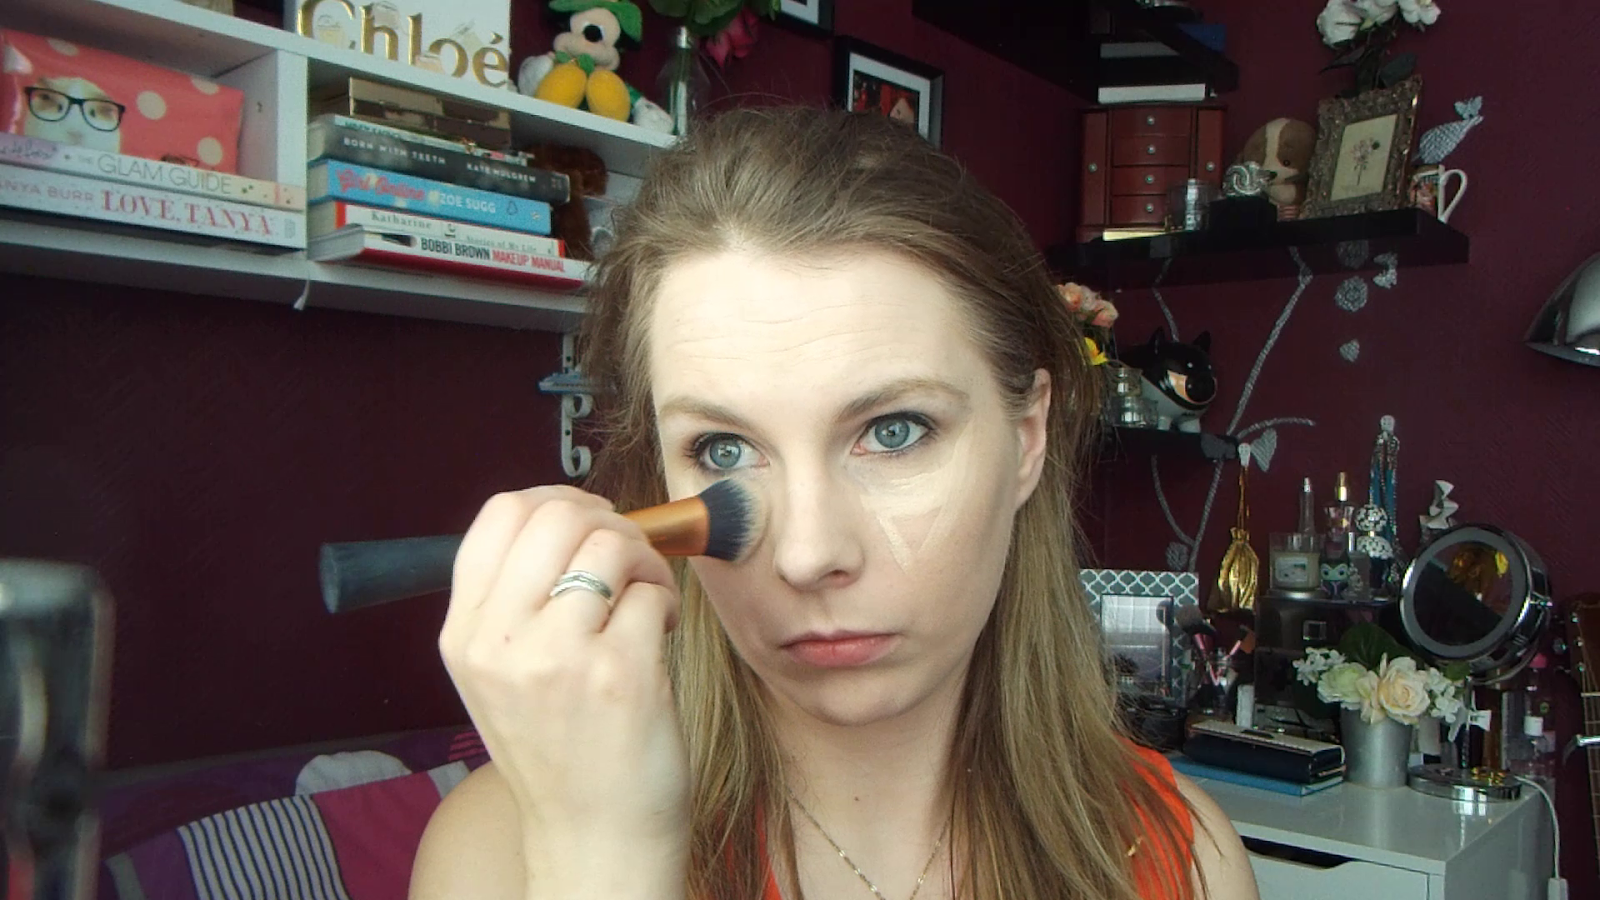


To brighten my under-eye area and to give my eyes a little makeshift lift, I took my Collection Lasting Perfection concealer and draw a triangle shape under my eyes. I used the Expert Face brush from before and blended it out in patting motions and blended it towards my temples to give that lifted effect.


I set that concealer with my L'Oreal True Match pressed powder (Rose Ivory) and my Real Techniques Contour Brush. I use the contour brush under my eyes and then use the Real Techniques Powder Brush for the rest of my face. If you have oily skin, it's best to set your foundation and concealer. If you've got drier skin, you don't have to. I have drier skin but I do like to set everything as I like the finish. You do you.


To give some warmth to my face, I used L'Oreal's Glam Duo bronze & highlight kit (Blonde). On my Real Techniques Blush brush, I took some of the bronzer and brushed it around the perimeter of my face. A tip is to draw an elongated '3' shape down the side of your face - sweet down from the forehead, go in for the cheekbones, and then out and down along the ears and back in for the jaw-line. 3, is the magic number.


Blush time is my favourite time. To give a healthy flush to my skin, I used a pink-y blush. I don't have a lot of drugstore blushes as I like to splurge on the more high-end offerings. I took Sleek's blush in Rose Gold, which is labelled as a great dupe for NARS 'Orgasm' blush, on my Deli Plus powder brush (I'm obsessed with this brush). There is just a hint of shimmer in this blush that will give a beautiful glow to the cheeks.


Mary's lip colour looked a great mix between peach and nude. I don't really have a lipstick like that but I took the only peach-y toned lipstick I have which is Seventeen's Stay Pout in Just A Fling.


Blazer: Boohoo
Top: George - shown above
Vest: TJ Maxx (old)
Necklace: New Look (old)
So that concludes Major Crimes Week, everyone. Can we take a moment and just have a sniffle and look back on all the fond memories from the past week. We got to see how to get the look of DDA Emma Rios and DDA Andrea Hobbs the gals with the power to make deals! We also got the look of Captain Sharon Raydor, the best damn captain out there, and one of her detectives, Amy Sykes. Then today, here is a post on how to get the look of the woman behind Captain Raydor, Mary McDonnell (I nearly typed Major McDonnell - there's a certain ring to that, haha) and the outfit she wore at Phoenix Comic Con where she did a panel for Major Crimes. It's all related in a round about kind of type of way.
I hope that you all enjoyed the posts from this week and are excited for tomorrow night's premiere! It's been an absolute pleasure to put these posts together for you all and I cannot thank you all enough for coming over and taking a look at this lil blog. It means the world to me.
Regular programming resumes tomorrow and I'll be doing some different makeup tutorials, unlike anything on this blog (well, maybe on par with the Guardians of the Galaxy themed tutorials), so come back for those if you want to. Have a wonderful day and I'll see you all soon.
Previous Major Crimes related posts
Get The Look Season 3 Promo | Get The Look || DDA Andrea Hobbs ||| Raydor's Rouge Get The Look || Sharon Raydor || Christmas Style 3x12 Acting Out || Get The Look 3x15 Chain Reaction
The Trenchcoat || 1x03 Get The Look || Get The Look || DDA Emma Rios
Get The Look || DDA Andrea Hobbs #2 || Get The Look || Sharon Raydor || Get the Look || Amy Sykes
* This mascara was a giveaway gift sent to me by Boots.com as part of their #BeautyTimeMachine series.
** Disclaimer: Some photos are taken from Tumblr. Full body photo in cover image and outfit image is taken from Mary McDonnell's verified Twitter account.
** Disclaimer: Some photos are taken from Tumblr. Full body photo in cover image and outfit image is taken from Mary McDonnell's verified Twitter account.


Comments
Post a Comment