TUTORIAL || Rogue [X-Men] Inspired Makeup Look
This post is definitely a more spontaneous Fandom Friday. Once Major Crimes Week finished on Sunday, I had no clue what I wanted to do for this week's posts, FF or otherwise. As unbelievably fun and exciting as MCW was, it was exhausting. That's why there was no Monday post this week. I was filming and editing on the fly and down to the wire most of the week. This post was actually inspired by my friend Philip.
Philip is a massive comic book nerd and loves to share his love for the genre. However, he does get stick for it. Not that long ago he tried to promote something good amongst all the depressing and negative posts that can be seen on all forms of social media. He posted a picture of Captain America and if you gave the post a 'Like', he would give you a comic book character. You had to know that I pushed that 'Like' button faster than I ever have. Be given a comic book character? Hell yes! So I liked the post and I was given Rogue. Cue me fist-bumping the air. I love Rogue. She's one of my favourite of the X-Men. You all know that Storm is my favourite because I dedicated my 100th post here to her >> HERE <<.
When an updated post came to his page that people had been criticising him for his previous post, I was appalled and shocked that people are still putting other people down for what they like. I experienced it and thankfully don't get it as much anymore. I love Star Trek, Star Wars, Marvel and DC and anything and everything. I love what I love and if it brings me the slightest bit of happiness, I really don't care what another person's opinion is. It makes me happy. What's wrong with that? Yes, about 60% of the posts on this blog are Mary McDonnell and Major Crimes related. It's my blog and I can do what I want with it. Nobody is ever going to make me change. I've loved Star Trek since I was 11 years old, I've been loving Star Wars for longer, I watched X-Men and Spiderman and Fantastic 4 animated series since I was maybe 10 and I've been a fangirl for Mary McDonnell for ten years. Don't like it? I don't really care because it's not going to change who I am or make me any less passionate. Let's be honest, there could be worse things that I could be interested in!
Long ramble done, here's what we're going to be going over today and that is a makeup tutorial inspired by Rogue from the X-Men. I largely think that this will be roughly similar to the makeup look that I did for St. Patrick's Day last year. Rogue's colours are predominantly (focusing on the original canon and the animated series) are green and yellow. I could do a more theatrical and dramatic look but I wanted something I bit more wearable.
The above image was some inspiration for this look but as you will see below, this look will largely be different. So without further adieu, let's get going, suga.
T H E L O O K
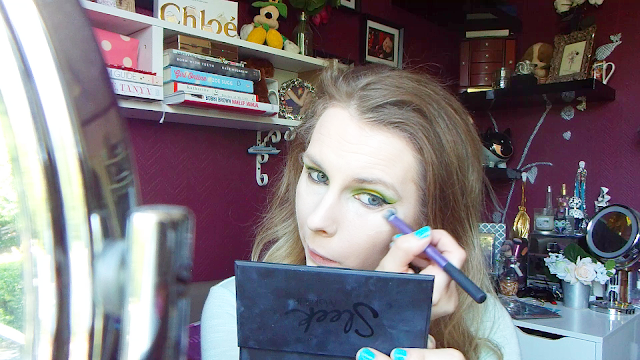
As you can see, I've already done one eye. That was my tester to see what I wanted to do it and how I was going to do it. I filled in my eyebrows using my Soap & Glory Archery pencil. I use the shade Blondeshell. I'm going to disclaim my brows because they desperately need waxed, like, a month ago.
To make the colours really pop on the lid, I primed my eyelid using Benefit's Boi-ing concealer. I used the lightest shade that they have. I patted it all over my eyelid and up to my brow bone with my finger. To make sure that it doesn't move or settle into the lines of my lids (aka crease), I set that concealer with my L'Oreal True Match pressed powder using a Real Techniques Setting Brush.
I wanted a dramatic wing for this look and so in order to keep my eyeshadows from going everywhere, I used the old sellotape trick. I took a strip of sellotape and placed one edge under my lower lashes and aimed the other side to the tail of my eyebrow. Make sure that you take some of the tackiness off the sellotape first by putting it on the back of your hand a couple of times.
Now that that's been taken care of, let's get to the fun part - the eyeshadows. You don't need to use precisely these shadows. All the shadows used in this tutorial are matte.
I started off with my transition shade. I took this eyeshadow from my Makeup Revolution Ultimate Eyeshadow palette. It doesn't have the greatest colour payoff but it does the trick here for what I want it to do. Using a fluffy blending brush, I used my MAC 217, I blended this through the crease and outer corner, building it up to the intensity that I wanted.
Then, I took a deeper green toned eyeshadow (it's not as blue toned off-camera). I took Kiko Cosmetics Infinity eyeshadow in 262 Mat Green. I used a fluffy tapered crease brush (Sephora Crease Shadow Brush) to run this shadow through the crease and concentrating it on the inner and outer corners of the lid. Make sure that you keep the lid as free from green eyeshadow as much as possible.
To darker it all up a little bit, I used Fern from my Sleek i-Divine Ultra Matte (v2) eyeshadow palette. I wanted the application of this shadow to be a bit more precise and used my Real Techniques Bold Metals Pointed Crease Brush. I used this to darken up that winged out part at the sellotape and then bring it down into the outer corner. Picking up some more product I ran it through my crease and inner corner. I also used it to neaten up the area above my crease.
Now, for the shadow that brings it altogether.
Going back to my Makeup Revolution palette, I took the bright yellow shadow on a dense, flat eyeshadow brush (I used my Kiko 203 eyes brush) and gently patted it in the centre of my lid in short motions. I started at the lashline and worked my way upwards and gently blending it into the green shadows either side. It doesn't have to look too blended.
Using my Real Techniques Accent Brush, I took that yellow shadow and ran it above my crease and also along my upper lashline.
With that same brush, I drew a wing with the yellow shadow. It doesn't have to be particularly neat as I'm going to be going over it with black eyeliner in a moment.
I took my Maybelline Lasting Drama gel eyeliner, with my Real Techniques Silicone Liner Brush and a dense liner brush from Sephora, I drew a cat eye with the help of that sellotape.
Remove le sellotape! What a face! I always look so serious!
I lined my waterline and tightline with my Rimmel Special Eyes Precision black eyeliner pencil.
I'll be back to work on the lower lashline in a moment. Here's where I moved onto my face.
For my foundation, I used L'Oreal's Mattifying Infallible Foundation (Porcelain) and buffed that into my skin using my Real Techniques Buffing Brush. I took special care around my eyes and that winged liner.
To conceal and to get some coverage to my under-eye area, I used Urban Decay's Naked Concealer. I used the shade Fair Neutral. I blended that out using my Real Techniques Deluxe Crease Brush. This brush helped me get close to my lower lashline and let me get close to the winged liner without disturbing it.
I set everything using my L'Oreal True Match Pressed Powder (Rose Ivory). I using my Real Techniques Setting Brush for my under-eye area and then my Real Techniques Powder Brush for the rest of my face.
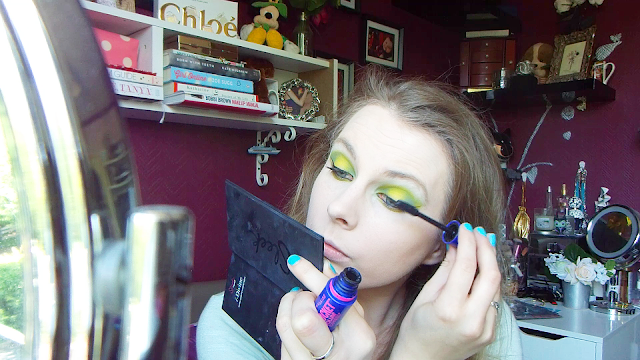
On that Real Techniques Accent Brush from before, I took that yellow eyeshadow once more and took it to my lower lashline, buffing it out and bringing it right along that lashline and out to meet the black winged liner.
I don't know why I left my mascara to this point but I did. I curled my eyeslashes and used my Maybelline The Rocket mascara on my top lashes only.
I lightly contoured my face using Maybelline's Master Sculpt kit (Light to Medium) and my No7 Contour & Highlighter Brush. I applied this to the hollows on my cheek, right under my cheekbone and blended it upwards towards my temple. I also applied it to my temple, hairline and jawline to give some definition to my face.
For blush, I used my Clinique Color Pop Blush in the shade Melon Pop. I just bought this the other day and you'll be seeing it in an upcoming High-End Makeup Wishlist post. Oops. I couldn't wait to use it and hadn't planned on being in Belfast so soon. I applied this to my cheeks using my Real Techniques Retractable Kabuki Brush.
For lips, I kept them neutral by using L'Oreal's Color Riche lipstick in the shade 379 Sensual Rose.
Cardigan: New Look [old]
Jacket: Next [old]
Vest: TJ Maxx [old]
Nail varnish: Kiko Milano Nail Lacquer 344 Light Misty Green
Nail varnish: Kiko Milano Nail Lacquer 344 Light Misty Green
I also curled my hair because Rogue has some head of hair on her in the comics and the animated series. Girl has volume!
I hope that you liked this tutorial. If you recreate it, I would love to see it. You can tag me on various social media. Buttons with links to all my social media are down the right hand side underneath my profile picture om the homepage.
If you want to see more Marvel inspired tutorials stay tuned because more will be coming through the Summer. Additionally you can browse through my other Marvel inspired makeup looks. I have previously done tutorials for Storm || Gamora || Nebula.
Thank you for stopping by, have a lovely Friday and I will hopefully see you again soon.
Disclaimer: Image of Rogue used in header image from Google.


Comments
Post a Comment